Syllables
Arduino
- What is Arduino
- Arduino Hardware
- Arduino Software
Light Automation by Arduino
- Light blinking
- Ambulance lights
- Traffic lights
- Chaser lights
- 5 by 5 lights
Servo Motor
- What is servo motor
- How does it work.
- How does connection
- How does coding
- 1 servo run on 45
- 2 servo connection and coding
Project 1 - make a project by using 2 Leds and 1 servo.
Motor driver
- What is Motor driver
- How does it work.
- How does connection
- How does coding
project 2 - make a project by using motor driver, 2 motors etc.
project 3- make a robot using servo motors and moter driver
Arduino - Arduino is an open-source electronics platform based on easy-to-use hardware and software. It consists of a microcontroller (a small computer on a single integrated circuit) and an integrated development environment (IDE) that allows you to write and upload code to the board.
Here’s a quick breakdown of what Arduino is and how it’s used:
1. **Hardware**: Arduino boards typically have a microcontroller, input/output pins, and various components such as LEDs, resistors, and connectors. Popular boards include the Arduino Uno, Arduino Nano, and Arduino Mega.
2. **Software**: The Arduino IDE is where you write and upload code (called sketches) to the board. The code is written in a simplified version of C++ and is used to control the board’s behavior.
3. **Community and Ecosystem**: Arduino has a large and active community that contributes to a vast array of libraries, tutorials, and projects. This makes it easier for beginners to start experimenting and for advanced users to build complex systems.
4. **Applications**: Arduino is used in a wide range of applications, from simple projects like blinking LEDs to more complex systems like home automation, robotics, and interactive art.
Overall, Arduino is popular because it’s accessible to beginners yet powerful enough for advanced projects, making it a versatile tool for learning and creating electronics.
A second is equal to 1000 milliseconds.
void setup() {
pinMode(2, OUTPUT);
}
void loop() {
digitalWrite(2, HIGH); // Turn the LED on
delay(1000); // Wait 1 second (1000 milliseconds)
digitalWrite(2, LOW); // Turn the LED off
delay(1000); // Wait 1 second
}
void setup() {
pinMode(2, OUTPUT);
pinMode(3, OUTPUT);
}
void loop() {
digitalWrite(2, HIGH);
delay(1000);
digitalWrite(2, LOW);
delay(1000);
digitalWrite(3, HIGH);
delay(1000);
digitalWrite(3, LOW);
delay(1000);
void setup() {
pinMode(2, OUTPUT);
pinMode(3, OUTPUT);
pinMode(4, OUTPUT);
}
void loop() {
digitalWrite(2, HIGH);
delay(1000);
digitalWrite(2, LOW);
delay(1000);
digitalWrite(3, HIGH);
delay(1000);
digitalWrite(3, LOW);
delay(1000);
digitalWrite(4, HIGH);
delay(1000);
digitalWrite(4, LOW);
delay(1000);
}
Chasser light
void setup() {
pinMode(2, OUTPUT);
pinMode(3, OUTPUT);
pinMode(4, OUTPUT);
pinMode(5, OUTPUT);
pinMode(6, OUTPUT);
}
void loop() {
digitalWrite(2, HIGH);
delay(1000);
digitalWrite(2, LOW);
delay(1000);
digitalWrite(3, HIGH);
delay(1000);
digitalWrite(3, LOW);
delay(1000);
digitalWrite(4, HIGH);
delay(1000);
digitalWrite(4, LOW);
delay(1000);
digitalWrite(5, HIGH);
delay(1000);
digitalWrite(5, LOW);
delay(1000);
digitalWrite(6, HIGH);
delay(1000);
digitalWrite(6, LOW);
delay(1000);
}
Servo motor
A
servo motor is a special type of motor that can
move to a specific position and
stay there. It can turn
left, right, or to any angle you want with great accuracy.
Run servo 45 degree
#include <Servo.h>
Servo myservo; // create servo object to control a servo
int pos = 0; // variable to store the servo position
void setup() {
S1.attach(9); // attaches the servo on pin 9 to the servo object
}
void loop() {
for (pos = 0; pos <= 180; pos += 1) { // goes from 0 degrees to 180 degrees
// in steps of 1 degree
S1.write(pos); // tell servo to go to position in variable 'pos'
delay(15); // waits 15 ms for the servo to reach the position
}
for (pos = 180; pos >= 0; pos -= 1) { // goes from 180 degrees to 0 degrees
S1.write(pos); // tell servo to go to position in variable 'pos'
delay(15); // waits 15 ms for the servo to reach the position
}
}
2 servos connection and coding #include <Servo.h>
Servo S1;
Servo S2;
int pos = 0;
void setup() {
S1.attach(9);
}
void loop() {
for (pos = 0; pos <= 180; pos += 1) {
S1.write(pos);
delay(15);
}
for (pos = 180; pos >= 0; pos -= 1) {
S1.write(pos);
delay(15);
}
for (pos = 0; pos <= 180; pos += 1) {
S2.write(pos);
delay(15);
}
for (pos = 180; pos >= 0; pos -= 1) {
S2.write(pos);
delay(15);
}
}
Multi servo #include <Servo.h>
Servo S1;
Servo S2;
Servo S2;
int pos = 0;
void setup() {
S1.attach(9);
}
void loop() {
for (pos = 0; pos <= 180; pos += 1) {
S1.write(pos);
delay(15);
}
for (pos = 180; pos >= 0; pos -= 1) {
S1.write(pos);
delay(15);
}
for (pos = 0; pos <= 180; pos += 1) {
S2.write(pos);
delay(15);
}
for (pos = 180; pos >= 0; pos -= 1) {
S2.write(pos);
delay(15);
}
for (pos = 0; pos <= 180; pos += 1) {
S3.write(pos);
delay(15);
}
for (pos = 180; pos >= 0; pos -= 1) {
S3.write(pos);
delay(15);
}
}
Project 1 :- Make a project with the help of servo motor and led ( 1 student must be use at least 1 servo)
Simple robe head.jpeg)
Toll gate
Auto Bridge
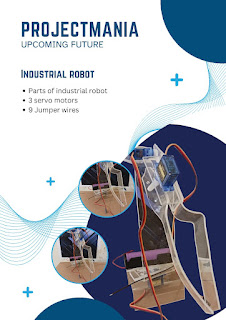
Industrial robot
mini robot
Motor driver - Motor driver is an electronics device that can control motor speed and direction.
#define in1 2
#define in2 3
#define in3 4
#define in4 5
#define EnA 9
#define EnB 10
void setup() {
pinMode(2,OUTPUT);
pinMode(3,OUTPUT);
pinMode(4,OUTPUT);
pinMode(5,OUTPUT);
pinMode(9,OUTPUT);
pinMode(10,OUTPUT);
}
void loop() {
digitalWrite(in1,HIGH);
digitalWrite(in3,HIGH);
digitalWrite(in2,LOW);
digitalWrite(in4,LOW);
delay(5000);
}
.jpeg)


.jpeg)


.jpeg)


Comments
Post a Comment